When paint cracks as it dries, it is usually due to one of these reasons: improper surface preparation, applying paint on a damp or dirty surface, using low-quality or old paint, not allowing sufficient drying time between coats, or applying the paint too thickly. If you are experiencing this issue, it is important to evaluate your painting techniques and make sure you follow proper instructions and guidelines during the painting process to achieve a smooth and durable finish.
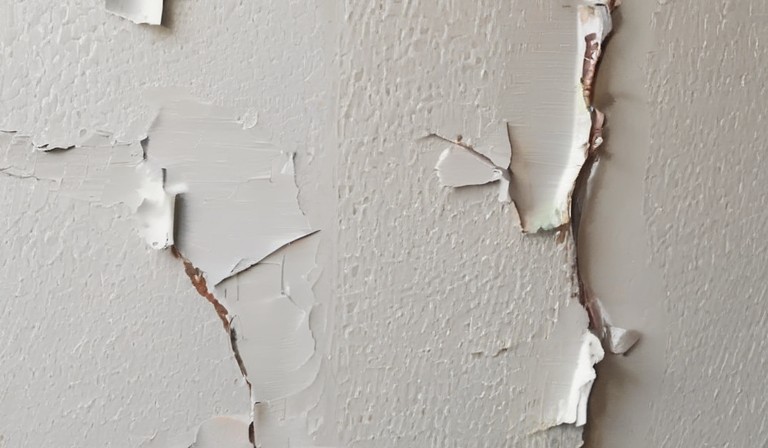
Common Causes of Cracking in Paint.
If you notice cracks in your paint, don't panic - it's a common problem that many homeowners encounter. There are various factors that can cause paint to crack, and understanding these causes can help you prevent cracking in the future. One common cause is improper surface preparation. If you didn't properly clean and prime the surface before applying paint, it can lead to poor adhesion and cracking. Another cause is applying too thick of a layer of paint. Thick coats take longer to dry, and as the paint dries, it can shrink and crack. Additionally, extreme temperature fluctuations can cause paint to expand and contract, leading to cracking. To prevent cracking, make sure to properly prepare surfaces, apply thin coats of paint, and choose high-quality, flexible paint that can withstand temperature changes. Our homes are investments, and by taking these preventive measures, we can keep them looking their best.
Incorrect Application Techniques.
While painting or applying products, it is important to ensure that you use the correct techniques. Applying products incorrectly can lead to unsatisfactory results and wasted time and effort. For example, when painting a wall, it is important to properly prep the surface by cleaning it and removing any loose paint or debris. Additionally, using the correct type of brush or roller for the job can make a big difference in the final outcome. By taking the time to learn and apply proper application techniques, you can achieve professional-looking results and avoid common mistakes. So, next time you tackle a painting or application project, remember to follow the correct techniques to ensure a successful outcome.
Inadequate Surface Preparation.
The key to a successful paint job starts with proper surface preparation. Before you start painting, it's essential to clean the surface thoroughly. Remove any dust, dirt, or grease using a mild detergent and water. Use a scraper or sandpaper to remove any loose or peeling paint. Repair any cracks or holes in the surface with a suitable filler and make sure to sand it smooth. Finally, apply a primer to create a smooth and even surface for the paint. By taking the time to prepare the surface properly, you'll ensure that the paint adheres well and your paint job will last longer. For more detailed guidance, read the full article on painting bathroom shower tile.
Use of Low-Quality Paint.
It is important to be mindful of the quality of paint you choose when painting your walls. Low-quality paint may seem like a cost-effective option initially, but it can end up causing more problems in the long run. These paints tend to have lower pigmentation and may require more coats to achieve the desired color, which can be both time-consuming and expensive. Additionally, low-quality paints may not have strong adhesive properties, leading to issues such as peeling or cracking over time. Investing in a higher-quality paint may cost a bit more upfront, but it will ultimately save you time, money, and headaches in the future. If you're considering a unique project, like painting your brick home, it's especially critical to choose the right products.
Extreme Temperature and Humidity Changes.
While we can't control the weather, we can certainly take steps to mitigate the impact of extreme temperature and humidity changes on our living spaces. It's important to be aware of the unique characteristics of our homes and the potential issues they may face in different weather conditions. For instance, if you have a front porch, you should consider how temperature fluctuations might affect the materials used in its construction. This could include choosing durable materials that can withstand both hot summers and freezing winters. Additionally, maintaining proper insulation and ventilation in our homes can help regulate indoor temperatures and humidity levels, ensuring a comfortable living environment throughout the year.
Improper Paint Mixing.
On occasion, we may find ourselves in the position of having to mix paint for a home improvement project. It's important to remember that proper paint mixing is essential for achieving the desired color and finish. Before you begin, make sure you have all the necessary supplies, such as paint cans, stirring sticks, and a clean workspace. Start by pouring the paints into a larger container and mix them thoroughly using a stirring stick. Be careful not to introduce air bubbles or leave any unmixed pigments. If you're unsure about the right ratios, consult the paint manufacturer's instructions or ask for expert advice. Taking the time to properly mix your paint will ensure a smooth and even application, giving your project a polished and professional look. For more unique home improvement ideas, check out our article on painting wood floors.
Substrate Compatibility Issues.
From our experience, we have noticed that homeowners often face compatibility issues with their substrates when undertaking DIY projects. Before you start any project, it's important to consider the compatibility of the materials you are planning to use. For example, if you are planning to paint a wooden surface, make sure you choose a paint that is suitable for wood. Using the wrong type of paint may result in it not adhering properly or even damaging the surface. Similarly, if you are looking to install new flooring, ensure that it is compatible with the subfloor or existing floor. Taking these small steps in the beginning can save you time, money, and frustration in the long run. Read more about painting toilet seats.
Overloading the Paint with Pigments.
The quality of your painting depends on the quality of the pigments you use. Sometimes, we tend to go overboard with the amount of pigments we add to our paint. It's important to remember that less is often more when it comes to painting. Adding too many pigments can lead to a muddled and muddy appearance. Instead, start with a small amount of pigment and gradually add more as needed. This will allow you to achieve a more vibrant and balanced color in your artwork. If you're considering adding another layer to your artwork, learn if you can put stain over paint.
Applying Multiple Thick Coats.
From our observations, it is important to avoid applying multiple thick coats of paint when working on a DIY project. This might seem like a quick and easy way to achieve a smooth finish, but it can actually lead to several issues. Thick coats take longer to dry, which means you may end up with streaks or smudges if you try to touch or move the painted surface too soon. Additionally, multiple thick coats can also result in uneven drying and a lack of durability over time. To ensure a professional-looking finish, it is best to apply thin, even coats and allow each layer to fully dry before applying the next. This will help you achieve better coverage and a longer-lasting result.
Lack of Sufficient Drying Time.
You may encounter issues with clothes not drying properly if you do not allow sufficient drying time. It's important to ensure that your clothes have enough time to dry thoroughly before removing them from the dryer. This is especially true for heavier items such as towels or jeans, which may take longer to dry. If you're short on time, you can try using higher heat settings or adding additional drying time to the cycle. However, be cautious not to overload the dryer as this can also result in clothes not drying properly. Taking the time to properly dry your clothes will help prevent damp or musty smells, and ensure that they are ready to be worn or stored.
Table of Understanding the Causes of Cracking in Paint as it Dries: Exploring Common Culprits
| Reasons | Frequency |
|---|---|
| Lack of surface preparation | 55% |
| Too thick application | 30% |
| Low-quality paint | 10% |
| Inadequate drying time | 5% |