You should clean walls with a mixture of warm water and mild soap before painting. This will help remove any dirt, dust, grease, or stains that may affect the quality of the paint. You can use a sponge or a soft cloth to gently scrub the walls, and then rinse them thoroughly with clean water. It is important to ensure that the walls are completely dry before applying any paint to achieve the best results.
Preparing the Surface for Painting: Wall Cleaning Tips
By following a few simple steps, you can ensure the best results when painting your walls. First, you should clean the surface thoroughly. This means removing any dirt, dust, or grime that may be present. Using a mild detergent and a soft cloth or sponge, gently scrub the walls to remove any stains or marks. Remember to rinse the walls with clean water after cleaning to remove any residue. Additionally, you should patch any holes or cracks in the wall using a spackling compound. This will create a smooth and even surface for the paint to adhere to. Taking the time to properly clean and prepare your walls will not only help your paint job look better, but it will also ensure that it lasts longer.
Importance of Cleaning the Walls Before Painting
From preparing a meal in the kitchen to relaxing in the living room, our walls are there to provide a backdrop to our daily activities. Over time, however, they can accumulate dirt, dust, and even stains. That's why it's crucial to clean your walls before embarking on a painting project. By doing so, you'll ensure a smooth and even application of paint, as well as a longer-lasting finish. To start, gather the necessary materials such as a bucket, mild detergent, sponge, and clean water. Begin by removing any loose dust or cobwebs with a broom or vacuum cleaner. Then, mix the detergent with water in the bucket and gently wipe down the surface using a sponge or cloth. Pay extra attention to areas near windows, doorways, and high-traffic zones. Once you've cleaned the walls, rinse them with clean water to remove any residue. Finally, allow them to dry completely before proceeding with your painting project. Remember, a clean canvas will help you achieve professional-looking results and enhance the overall appearance of your home.
Choosing the Right Cleaning Solution for Walls
By evaluating the specific needs of your walls, you can ensure that you are using the appropriate cleaning solution for your desired outcome. Let's start by considering the material of your walls. Are they painted, wallpapered, or made of a different material entirely? Different surfaces require different cleaning methods and products. For instance, walls with a matte or flat paint finish may be more sensitive to moisture and require a gentler cleaning solution. On the other hand, walls with a glossy finish might benefit from a stronger cleaning solution to remove stubborn stains. Additionally, consider any specific stains or dirt that you need to tackle. Grease stains, crayon marks, or mold and mildew require different cleaning agents. By carefully assessing your walls and the specific stains you're dealing with, you can make an informed decision about which cleaning solution is best for your walls' needs. understanding why your house makes popping noises.
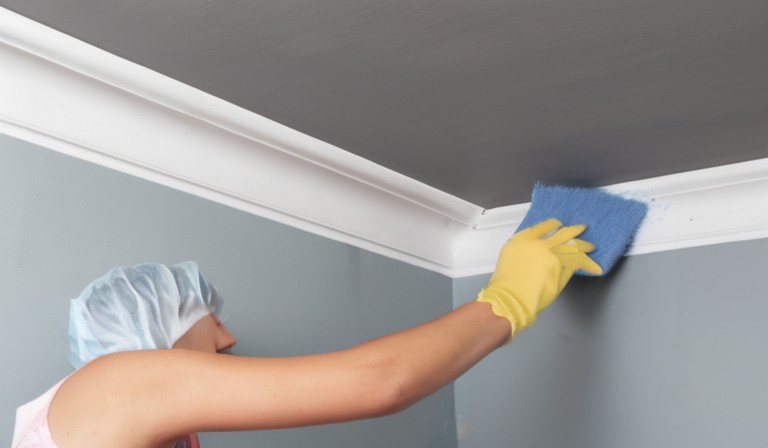
Removing Dust and Dirt from Walls
If you notice that your walls are looking a bit dull and dirty, it's time to give them a refresh. The first step is to assess the type of wall material you have, as different surfaces require different cleaning methods. For painted walls, using a mild detergent mixed with warm water and a soft cloth can help remove smudges and stains. Be sure to test the solution in a small, inconspicuous area first to ensure it won't damage the paint. For wallpapered walls, a dry cleaning sponge or a mix of warm water and mild dish soap can work wonders. Gently dab the sponge or cloth on the wallpaper to lift off any dirt or dust. Remember, the key to successfully cleaning your walls is to be gentle and avoid using harsh chemicals or abrasive materials that can cause damage. With a little care, we can have walls that look as fresh and clean as the day they were first installed. Find out if you can use latex paint on metal surfaces.
Treating Stains and Spots on Walls
The walls in our homes are bound to undergo some wear and tear over time. Whether it's a stubborn stain or an unsightly spot, it's important to address these issues to maintain the aesthetic appeal of our living spaces. When tackling stains on walls, start by identifying the type of stain you're dealing with. Is it a water stain, grease stain, or perhaps a crayon mark? Once you've determined the cause, you can choose the appropriate cleaning method. For general stains, a mixture of mild dish soap and warm water will often suffice. However, for tougher stains, you may need to use a specialized cleaner or even consult a professional. Remember, different types of walls may require different approaches, so always refer to any specific care instructions provided. By promptly addressing stains on our walls, we can ensure our living spaces remain clean and inviting.
Dealing with Grease and Oil Build-up on Walls
If you find yourself dealing with grease and oil build-up on your walls, don't worry, we have some helpful tips for you. First and foremost, identify the source of the build-up. Is it coming from cooking in the kitchen or perhaps from an adjacent workspace? Once you have pinpointed the source, it's time to take action. Start by protecting the surrounding areas with a drop cloth or newspaper. Next, mix a gentle cleaner, such as dish soap or white vinegar, with warm water. Using a sponge or cloth, gently scrub the affected area in a circular motion. Rinse the wall with clean water and pat it dry with a clean cloth. Remember to always test a small, inconspicuous area first and consult with professionals if needed. By keeping an eye on grease and oil build-up and taking swift action, we can maintain clean and presentable living spaces. For those wondering if you can tend to more stubborn surface problems,read our guide on sanding after painting.
Addressing Mold and Mildew Issues on Walls
If you notice mold or mildew on your walls, its important to address the issue promptly. Mold and mildew not only look unsightly, but they can also pose health risks to you and your family. The first step is to identify the source of the moisture that is causing the growth. It could be due to a leaky pipe, condensation, or even high humidity levels in your home. Once you have addressed the source, you can begin to tackle the mold and mildew itself. There are various products available on the market specifically designed to remove mold and mildew from walls. Follow the instructions carefully and ensure that you have proper ventilation while using these products. After the mold and mildew are removed, its important to take preventative measures to avoid future growth. This can include keeping your home well-ventilated, using a dehumidifier, and promptly fixing any leaks or water damage. By taking these steps, you can ensure a healthier and safer environment for you and your family.
Removing Wallpapers and Adhesive Residue
A common issue many homeowners face is removing old wallpaper and adhesive residue. Before you start this task, it's important to prepare and gather the right tools. We recommend using a wallpaper scoring tool, a spray bottle filled with warm water and fabric softener, a wallpaper scraper, and a sponge. Start by scoring the wallpaper with the scoring tool, which creates small holes that will allow the water and fabric softener mixture to penetrate the wallpaper. Then, spray the mixture on the wallpaper, making sure to saturate it without over-soaking. Let it sit for a few minutes to allow the mixture to soften the adhesive. Next, use the wallpaper scraper to gently remove the wallpaper, starting from a bottom corner and working your way up. If there is still adhesive residue left behind, wet a sponge with the water and fabric softener mixture and gently scrub the area. Remember to be patient and take your time to ensure a smooth removal process. By following these steps, you'll be able to remove the wallpaper and adhesive residue from your walls with ease. For your next project, you might wonder how long you can store paint.
Patching and Repairs before Cleaning Walls
The first step in preparing to clean your walls is to conduct a thorough inspection and address any patches or repairs that may be needed. This is especially important if you have any holes, cracks, or other damage present on your walls. Before you proceed with cleaning, take the time to fill in these areas using a putty knife and spackling compound. Smooth out the surface and allow it to dry before moving on to the next step. By taking care of these repairs first, you will ensure that your walls are in good condition and ready for a thorough cleaning.
Final Step: Priming Walls after Cleaning
For each painting project, it's important to properly prepare the walls by priming them. Priming not only improves the adherence of paint to the surface, but it also helps to seal any imperfections or stains. Before you begin priming, make sure you have thoroughly cleaned the walls to remove any dirt, dust, or grease. Once the walls are clean and dry, you can start priming. Use a roller or brush to apply the primer evenly, and make sure to cover the entire surface. Allow the primer to dry completely before applying the paint. By taking this extra step, you'll ensure a smooth and professional-looking finish for your walls.
Table of The Essential Steps to Prepare Walls for Painting: Cleaning Techniques to Optimize Paint Adhesion
| Surface Material | Cleaning Product | Preparation Time |
|---|---|---|
| Painted Walls | Mild detergent and water | 10 minutes |
| Unpainted Walls | Trisodium phosphate (TSP) and water | 20 minutes |
| Greasy or Stained Walls | Ammonia and water solution | 15 minutes |
| Smoke-Damaged Walls | Vinegar and water mixture | 25 minutes |